
Hybrid identity
Hands-on lab step-by-step
May 2022
Information in this document, including URL and other Internet Web site references, is subject to change without notice. Unless otherwise noted, the example companies, organizations, products, domain names, e-mail addresses, logos, people, places, and events depicted herein are fictitious, and no association with any real company, organization, product, domain name, e-mail address, logo, person, place or event is intended or should be inferred. Complying with all applicable copyright laws is the responsibility of the user. Without limiting the rights under copyright, no part of this document may be reproduced, stored in or introduced into a retrieval system, or transmitted in any form or by any means (electronic, mechanical, photocopying, recording, or otherwise), or for any purpose, without the express written permission of Microsoft Corporation.
Microsoft may have patents, patent applications, trademarks, copyrights, or other intellectual property rights covering subject matter in this document. Except as expressly provided in any written license agreement from Microsoft, the furnishing of this document does not give you any license to these patents, trademarks, copyrights, or other intellectual property.
The names of manufacturers, products, or URLs are provided for informational purposes only and Microsoft makes no representations and warranties, either expressed, implied, or statutory, regarding these manufacturers or the use of the products with any Microsoft technologies. The inclusion of a manufacturer or product does not imply endorsement of Microsoft of the manufacturer or product. Links may be provided to third party sites. Such sites are not under the control of Microsoft and Microsoft is not responsible for the contents of any linked site or any link contained in a linked site, or any changes or updates to such sites. Microsoft is not responsible for webcasting or any other form of transmission received from any linked site. Microsoft is providing these links to you only as a convenience, and the inclusion of any link does not imply endorsement of Microsoft of the site or the products contained therein.
© 2022 Microsoft Corporation. All rights reserved.
Microsoft and the trademarks listed at https://www.microsoft.com/en-us/legal/intellectualproperty/Trademarks/Usage/General.aspx are trademarks of the Microsoft group of companies. All other trademarks are property of their respective owners.
Contents
In this hands-on lab, you will set up and configure a number of different hybrid identity scenarios. The scenarios involve an Active Directory single-domain forest named corp.contoso.com, which consists (for simplicity reasons) of a single domain controller named DC1 and a single domain member server named APP1. The intention is to explore Azure AD-related capabilities that allow you to integrate Active Directory with Azure Active Directory, optimize hybrid authentication and authorization, and provide secure access to on-premises resources from the Internet for both organizational users and users who are members of partner organizations.
Contoso has asked you to integrate their on-premises Active Directory single-domain forest named corp.contoso.com with Azure AD and implement all necessary prerequisites to allow them to benefit from such Azure AD features as single sign-on to cloud and on-premises applications, enhanced sign-in security with Multi-Factor Authentication and Windows Hello for Business, Hybrid Azure AD join, Self-Service Password Reset and Password Protection, automatic enrollment of Windows 10 devices into Microsoft Intune, and Azure AD Privileged Identity Protection. They also want to provide secure access to their on-premises, Windows Integrated Authentication-based applications from the Internet for both organizational users and users who are members of partner organizations. However, they also want to loosen restrictions when access originates from Hybrid Azure AD joined computers residing in their on-premises data centers. The same applications must also be made available to Contoso’s business partners.
From the architectural standpoint, the deployment will consist of the following components:
On-premises Active Directory environment consisting of a single domain controller (DC1) and one domain member server (APP1), running Windows Server 2016 operating system.
Contoso Azure AD tenant
Fabrikam Azure AD tenant

Duration: 150 minutes
Overview
In this exercise, you will integrate an Active Directory forest with an Azure Active Directory tenant by creating an Azure Active Directory tenant and activating an Enterprise Mobility + Security E5 trial, creating and configuring an Azure AD user, purchasing a custom domain name, assigning a custom domain name to the Contoso Azure AD tenant, configuring DNS suffix in the Contoso Active Directory forest, installing Azure AD Connect, enable Active Directory Recycle Bin, configuring Azure AD Connect attribute-level filtering, initiating and verifying directory synchronization, configuring Hybrid Azure AD join, and performing Hybrid Azure AD join of a Windows Server 2016 VM.
In this task, you will create an Azure Active Directory tenant with the following settings:
Organization name: Contoso
Initial domain name: Any valid, unique domain name.
Country or region: United States
Start a new Web browser window from the lab computer and navigate to the Azure portal at https://portal.azure.com if you haven’t already.
When prompted, sign in to the Azure subscription into which you deployed resources in the Before the hands-on lab exercises.
On the lab computer, in the Azure portal, select + Create a resource.
On the New blade, in the Search the Marketplace text box, type Azure Active Directory and, in the list of results, select Azure Active Directory.

Select Create.
On the Basics tab, leave Azure Active Directory selected and select Next: Configuration >

On the Configuration tab, specify the following settings and select Review + create. Then select Create.
Organization name: Contoso
Initial domain name: Any valid, unique domain name.
Country or region: United States
Once it’s created, follow the link to navigate to your new tenant.

On the Contoso - Overview blade, select Licenses under Manage on the left navigation.
On the Contoso - Licenses, blade, select All Products and select + Try/Buy.
On the Activate blade, in the ENTERPRISE MOBILITY + SECURITY E5 section, select Free trial and then select Activate.

Note: Activation typically takes about 5 minutes. Refresh the page to see the license added.
In this task, you will configure Azure AD user accounts in the newly created Azure AD tenant with the following settings. These settings include assigning EM+S E5 licenses to the user account you are using for this lab, creating a new Azure AD user account, and assigning the Global Administrator role.
From the lab computer, in the Azure portal, navigate back to the Contoso - Overview blade.
On the Contoso - Overview blade, select Users under Manage in the left navigation.
Select the entry representing your user account on the Users - All users blade.
On the Profile blade of your user account, select Edit.

In the Settings section, in the Usage location dropdown list, select the United States entry and select Save.

On the Profile blade of your user account, select Licenses under Manage on the left.
On the Licenses blade, select + Assignments.
On the Update license assignments blade, enable the Enterprise Mobility + Security E5 checkbox, ensure all the corresponding license options are enabled, and select Save.

On the Users - All users blade, select + New user.
On the New user blade, ensure that the Create user option is selected, specify the following settings, and select Create:
User name: john.doe@your Azure AD tenant domain name where your Azure AD tenant domain name is the domain name you specified when creating the Contoso Azure AD tenant.
Name: john.doe
First name: John
Last name: Doe
Password: Auto-generate password
Show Password: Enabled
Groups: 0 group selected
Roles: Global Administrator
Block sign in: No
Usage location: United States
Job title: Leave blank
Department: Leave blank

Note: Copy the User name and Password values into Notepad. You will need them later in this lab.
On the Users - All users blade, select the entry representing the newly created user account.
On the john.doe - Profile blade, select Licenses under Manage on the left.
On the john.doe - Licenses blade, select + Assignments.
On the Update license assignments blade, enable the Enterprise Mobility + Security E5 checkbox, ensure all the corresponding license options are enabled, and select Save.

In this task, you will purchase a custom DNS domain name by leveraging the functionality described at https://docs.microsoft.com/en-us/azure/app-service/manage-custom-dns-buy-domain.
Return to the Azure Active Directory overview blade. Select Switch tenant and select the Default Directory associated with the Azure subscription into which you deployed resources in the Before Hands-On Lab exercises, then select Switch.

In the Azure portal’s left navigation, select + Create a resource.
Search for web app and select Create within Web App.

On the Basics tab of the Web App blade, specify the following settings, and select Next: Deployment:
Subscription: The name of the Azure subscription into which you deployed resources in the Before Hands-On Lab exercises.
Resource Group: (Create new) contosohilab-RG.
Name: Any valid, globally unique name.
Publish: Code
Runtime stack: .NET Core 3.1 (LTS)
Operating system: Windows
Region: Any Azure region in which you can create Azure Web Apps in the target subscription.
App Service plan: Accept the default.
SKU and size: Shared D1 (If necessary, select Change size, select Dev/Test, select D1 and select Apply)

Select Next: Networking and then Next: Monitoring.
On the Monitoring tab of the Web App blade, specify the following setting, and select Review + create then Create:
In the Azure portal, search for and select App Service Domains on the top search bar.

On the App Service Domains blade, select Create App Service Domain.
On the Basics tab, select your subscription, the contosohilab-RG Resource Group, search for a unique domain and select the one you want to use. Then select **Next: Contact Information*

Enter the required contact information and select Next: Advanced.
Ensure that Enable privacy protection is Enabled. Select Review + create then Create.

In this task, you will assign a newly purchased custom DNS domain name to the Contoso Azure AD tenant.
On the lab computer, in the Azure portal, select the Directory + Subscription icon in the toolbar of the Azure portal (to the right of the Cloud Shell icon) and switch to the Contoso Azure AD tenant.

In the Azure portal, navigate to Azure Active Directory to navigate to the Contoso - Overview blade.
On the Contoso - Overview blade, select Custom domain names under Manage on the left.
On the Contoso - Custom domain names blade, select + Add custom domain.

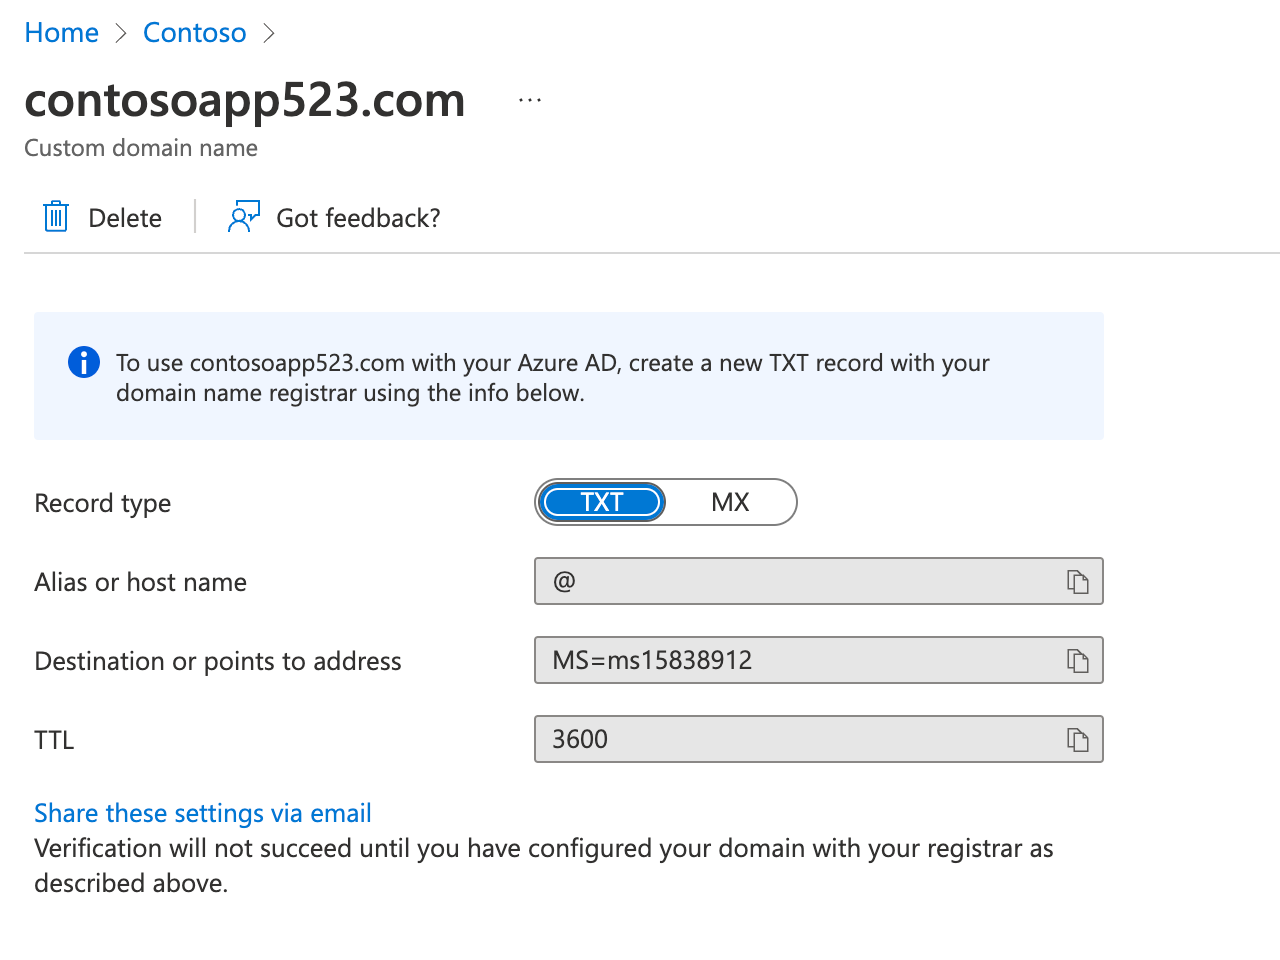
On the Add custom domain blade that appears on the right, in the Custom domain name text box, type the domain name you purchased in the previous task and select Add domain. You will be redirected to a new blade displaying your custom domain name settings.
Identify the value of the TXT record on the custom domain name blade.
On the lab computer, start another browser tab and navigate to the Azure portal.
In the Azure portal, select the Directory + Subscription icon in the toolbar of the Azure portal (to the right of the Cloud Shell icon) to switch to the Azure AD tenant associated with the Azure subscription into which you deployed resources in the Before Hands-On Lab exercises (the Default Directory).
In the Azure portal, select All services in the portal’s left navigation. In the Search All textbox, type DNS zones, and then select the DNS zones entry in the listing of search results.

On the DNS zones blade, select the entry with the name matching the custom domain name you purchased in the previous task.
On the DNS zone blade, select + Record set.
On the Add record set blade, specify the following settings, and select OK:
Name: @
Type: TXT
TTL: 1
TTL unit: Hours
Value: The value of the DESTINATION OR POINTS TO ADDRESS entry you identified on the Custom domain name blade.

Switch back to the browser window displaying the custom domain name blade, and select Verify. Ensure that the verification was successful.
Select Make primary and confirm the change when prompted.

In this task, you will configure the DNS suffix of the Contoso Active Directory forest to match the newly verified Azure AD custom domain name.
On the lab computer, in the Azure portal, verify that you are signed in to the Azure AD tenant associated with the Azure subscription into which you deployed resources in the Before Hands-On Lab exercises (the Default Directory). If not, select the Directory + Subscription icon in the toolbar of the Azure portal (to the right of the Cloud Shell icon) to switch to that Azure AD tenant.
In the Azure portal, navigate to the blade of the DC1 virtual machine.
On the DC1 virtual machine blade, connect to DC1 via Remote Desktop. When prompted to sign in, use the demouser name and the demo@pass123 password.
Within the Remote Desktop session to DC1, on the Server Manager window, start the Active Directory Domains and Trusts console under Tools.

In the Active Directory Domains and Trusts console, right-click Active Directory Domains and Trusts [DC1.corp.contoso.com] on the left and select Properties.

On the UPN Suffixes tab of the Active Directory Domains and Trusts [DC1.corp.contoso.com] window, in the Alternative UPN suffixes textbox, type the name of the custom domain you verified in the previous task, select Add, and then select OK.
![In this screenshot, the Active Directory Domains and Trusts [DC1.corp.contoso.com] window is depicted with the custom domain verified in the previous task added to the Alternative UPN suffixes selected. The OK button is then selected.](images/Hands-onlabstep-bystep-HybridIdentityImages/media/UPNSuffix.png "Add UPN suffix")
Within the Remote Desktop session to DC1, on the Server Manager window, start the Active Directory Users and Computers console under Tools.

In the Active Directory Users and Computers console, expand corp.contoso.com on the left and examine the organizational unit hierarchy of the domain and the group membership of the domain groups.

Within the Remote Desktop session to DC1, start Windows Visual Studio Code and update and run the following script. This will replace the UPN suffix of all users who are members of the Engineering group with the one matching the custom verified domain name of the Contoso Azure AD tenant (replace the placeholder <custom_domain_name> with the actual name of the custom verified domain name you assigned to the Contoso Azure AD tenant).
$domainName = '<custom_domain_name>'
$users = Get-ADGroupMember -Identity 'Engineering' -Recursive | Where-Object {$_.objectClass -eq 'user'}

foreach ($user in $users) {
    $user = Get-ADUser -Identity $User.SamAccountName
    $userName = $user.UserPrincipalName.Split('@')[0]
    $upn = $userName + "@" + $domainName
    $user | Set-ADUser -UserPrincipalName $upn
}In this task, you will install Azure AD Connect.
Within the Remote Desktop session to DC1, start the Edge browser and navigate to the Azure portal at https://portal.azure.com.
When prompted to sign in, enter the credentials of the john.doe Azure AD user account, which you copied into Notepad earlier in this exercise.
When prompted, change the password for the john.doe user account.
Note: If you receive the message We’ve seen that password too many times before. Choose something harder to guess; you’ll need to modify the password until it is unique enough to be accepted.
If prompted to Stay signed in?“ select No. You will be redirected to the Azure portal interface.
If presented with the Welcome to Microsoft Azure dialog box, select Maybe later.
In the Azure portal, navigate to Azure Active Directory in the Azure portal. Then navigate to the Contoso - Overview blade.
On the Contoso - Overview blade, select Azure AD Connect under Manage on the left.
On the Azure AD Connect blade, select the Download Azure AD Connect link.

On the Microsoft Azure Active Directory Connect web page of the Microsoft Downloads site, select Download.
Select Open file once the AzureADConnect.msi has finished downloading. Select Run to start the Microsoft Azure Active Directory Connect installation wizard.
On the Welcome to Azure AD Connect page, check the I agree to the license terms and privacy notice box and select Continue.

On the Express Settings page, select the Customize button.
On the Install required components page, leave all optional configuration options deselected and select Install.
On the User sign-in page, select the Pass-through authentication option, the Enable single sign-on checkboxes, and select Next.

On the Connect to Azure AD page, sign in by using the credentials of the john.doe account and select Next.
On the Connect your directories page, ensure that the corp.contoso.com entry appears in the FOREST drop-down list and select Add Directory. In the AD forest account, ensure that the Create new AD account option is selected, in the ENTERPRISE ADMIN USERNAME textbox, type CORP.CONTOSO.COM\demouser, in the PASSWORD textbox, type demo@pass123, and select OK.

Back on the Connect your directories page, select Next.
On the Azure AD sign-in configuration page, ensure that your custom domain name is listed as the verified Active Directory UPN Suffix and that the userPrincipalName entry appears in the USER PRINCIPAL NAME dropdown list. Note the warning stating Users will not be able to sign in to Azure AD with on-premises credentials if the UPN suffix does not match a verified domain name. Check the Continue without matching all UPN suffixes to the verified domain box and select Next.
Note: This is expected since some users are still configured with the contoso.local UPN suffix, which is not routable and cannot be configured as a verified custom domain name of an Azure AD tenant.

On the Domain and OU filtering page, ensure that only the DemoAccounts OU and all its children OUs are selected and select Next.

On the Uniquely identifying your users page, accept the default settings and select Next.

On the Filter users and devices page, accept the default settings and select Next.

On the Optional features page, accept the default settings and select Next.

On the Enable single sign-on page, select Enter credentials, in the Forest credentials dialog box, sign in with the CORP\demouser username and demo@pass123 password, and select Next.

On the Ready to configure page, ensure that the Start the synchronization process when configuration completes checkbox is NOT selected and select Install.

Note: You will configure attribute-level filtering before enabling the synchronization process. Installation should take about 2 minutes.
On the Configuration complete page, select Exit.

In this task, you will enable Recycle Bin in the Contoso Active Directory domain.
Within the Remote Desktop session to DC1, on the Tools menu in the Server Manager console, start Active Directory Administrative Center.

In the Active Directory Administrative Center console, right-click corp (local) on the left menu and select Enable Recycle Bin. When prompted to confirm, select OK.

When prompted to refresh AD Administrative Center, select OK.
Note: For information regarding the benefits of the Recycle Bin in hybrid scenarios, refer to https://docs.microsoft.com/en-us/azure/active-directory/hybrid/how-to-connect-sync-recycle-bin
In this task, you will configure Azure AD Connect attribute level filtering that will limit the synchronization of user accounts to those with the UPN suffix matching the custom domain name of the target Azure AD tenant.
Note: The positive filtering option requires at least two sync rules. One of them determines the correct scope of objects to synchronize. The second catch-all sync rule filters out all objects that have not yet been identified as an object that should be synchronized.
Within the Remote Desktop session to DC1, start Synchronization Rules Editor under Azure AD Connect in the Start menu.

In the Synchronization Rules Editor window, on the View and manage your synchronization rules page, ensure that Inbound appears in the Direction dropdown list and select Add new rule. This will launch the Create inbound synchronization rule wizard.

On the Create inbound synchronization rule - Description page, specify the following settings and select Next:
Name: Custom In from AD - UPN Filter
Description: Custom Inbound Rule - includes users with UPN set to match the Azure AD custom domain
Connected System: corp.contoso.com
Connected System Object Type: user
Metaverse Object Type: person
Link Type: join
Precedence: 50
Tag: Leave empty
Enable Password Sync: Leave empty
Disabled: Leave empty

On the Create inbound scoping filter page, select Add Group, select Add clause, specify the following, and select Next:
Attribute: userPrincipalName
Operator: ENDSWITH
Value: @<your custom domain name>

On the Join Rules page, select Next.
On the Transformations page, select Add transformation specify the following and select Add:
FlowType: Constant
Target Attribute: cloudFiltered
Source: False

When presented with a Warning dialog box displaying that message stating that A full import and full synchronization will be run on ‘corp.contoso.com’ during your next synchronization cycle, select OK.
Note: This should bring you back to the View and manage your synchronization rules interface, with the new rule listed at the top of the rule list.

Back in the Synchronization Rules Editor window, on the View and manage your synchronization rules page, ensure that Inbound appears in the Direction dropdown list and select Add new rule again. This will launch the Create inbound synchronization rule wizard.

On the Description page, specify the following settings and select Next:
Name: Custom In from AD - Catch-all Filter
Description: Custom Inbound Rule - excludes all users with UPN not set to match the Azure AD custom domain
Connected System: corp.contoso.com
Connected System Object Type: user
Metaverse Object Type: person
Link Type: join
Precedence: 51
Tag: Leave empty
Enable Password Sync: Leave empty
Disabled: Leave empty

On the Scoping filer page, select Next.
On the Join Rules page, select Next.
On the Transformations page, select Add transformation specify the following and select Add:
FlowType: Constant
Target Attribute: cloudFiltered
Source: True

When presented with a Warning dialog box displaying a message stating that A full import and full synchronization will be run on ‘corp.contoso.com’ during your next synchronization cycle, select OK.
Note: This should bring you back to the View and manage your synchronization rules interface, with the new rules listed at the top of the rule list.

Within the Remote Desktop session to DC1, double-click the Azure AD Connect desktop shortcut.
On the Welcome to Azure AD Connect page, select Configure.
On the Additional tasks page, select Customize synchronization options and select Next.

On the Connect to Azure AD page, sign in by using the credentials of the john.doe account and select Next.
On the Connect your directories page, select Next.
On the Domain and OU filtering page, select Next.
On the Optional features page, accept the default settings and select Next.
On the Enable single sign-on page, select Next.
On the Ready to configure page, select the Start the synchronization process when configuration completes checkbox and select Configure.

On the Configuration complete page, select Exit.
Within the Remote Desktop session to DC1, in the Edge browser window displaying the Azure portal, navigate to the Users - All users blade of the Contoso Azure AD tenant.

On the Users - All users blade, note that the list of user objects includes all user accounts with the UPN suffix matching the custom domain name of the Azure AD tenant. You may need to refresh the page or wait a few minutes to see the change.

In the Azure portal, navigate to the Groups - All groups blade of the Contoso Azure AD tenant and note that all the corp.contoso.com domain groups have been synchronized.
In the Azure portal, navigate to the Contoso - Azure AD Connect blade and select Azure AD Connect on the left. Verify that the following settings are set:
Azure AD Connect Sync Status: Enabled
Last Sync: This should be a timestamp of some sort.
Password Hash Sync: Disabled
Federation: Disabled
Seamless single sign-on: Enabled for one domain
Pass-through authentication: Enabled with one agent

Note: In a production environment, you would install additional agents for redundancy. For more information, refer to https://docs.microsoft.com/en-us/azure/active-directory/hybrid/how-to-connect-pta-quick-start.
In this task, you will configure Azure AD Connect device synchronization options.
Within the Remote Desktop session to DC1, double-click the Azure AD Connect desktop shortcut.
On the Welcome to Azure AD Connect page, select Configure.
On the Additional tasks page, select Configure device options and select Next.

On the Overview page, review the information regarding Hybrid Azure AD join and Device writeback, and select Next.
On the Connect to Azure AD page, sign in by using the credentials of the john.doe account and select Next.
On the Device options page, ensure that the Configure Hybrid Azure AD join option is selected and select Next.

On the Device operating system page, select the Windows 10 or later domain-joined devices and Supported Windows down-level domain-joined devices checkboxes, and select Next.
Note: Windows down-level devices are supported only if you are using Seamless SSO for managed domains or a federation service such as AD FS for federated domains.
On the SCP configuration page, check the corp.contoso.com Active Directory forest box, select the Azure Active Directory entry in the Authentication Service dropdown list, and select Add.

When prompted for Enterprise Admin Credentials for corp.contoso.com, in the Windows Security dialog box, sign in with the CORP\demouser user name and demo@pass123 password.
Back on the SCP configuration page, select Next.
On the Ready to configure page, select Configure.
On the Configuration complete page, verify that the task was completed successfully and select Exit.
Note: For more information regarding configuring hybrid Azure Active Directory join for managed domains, refer to https://docs.microsoft.com/en-us/azure/active-directory/devices/hybrid-azuread-join-managed-domains#configure-hybrid-azure-ad-join.
On the lab computer, in the Azure portal, verify that you are signed in to the Azure AD tenant associated with the Azure subscription into which you deployed resources in the Before Hands-On Lab exercises (the Default directory). If not, select the Directory + Subscription icon in the toolbar of the Azure portal (to the right of the Cloud Shell icon) to switch to that Azure AD tenant.
In the Azure portal, navigate to the blade of the APP1 virtual machine.
On the APP1 virtual machine blade, connect to APP1 via Remote Desktop. When prompted to sign in, use the AGAyers@
Within the Remote Desktop session to APP1, on the Server Manager window, start Task Scheduler under Tools.

In the Task Scheduler console, navigate to Task Scheduler Library > Microsoft > Windows > Workplace Join. From there, enable then run the Automatic-Device-Join task.

Switch to the Remote Desktop session to DC1 and, open a Windows PowerShell console, start Azure AD Connect delta synchronization by running the following:
Start-ADSyncSyncCycle -PolicyType DeltaSwitch back to the Remote Desktop session to APP1 and start a Command Prompt.
From the Command Prompt window, check the Azure AD registration status of APP1 by running the following:
dsregcmd /statusVerify that the output of the command resembles the following:
+----------------------------------------------------------------------+
| Device State                                                         |
+----------------------------------------------------------------------+

     AzureAdJoined : YES
  EnterpriseJoined : NO
          DeviceId : 61eea2b8-efbe-43d9-b267-126433c8ee34
        Thumbprint : BBAAA0FB4A55E880388851BED955A2669A961A96
    KeyContainerId : 2eb75eb8-0a1d-437b-99d9-9dd161ca0d90
       KeyProvider : Microsoft Software Key Storage Provider
      TpmProtected : NO
      KeySignTest: : PASSED
               Idp : login.windows.net
          TenantId : xxxxxxx-xxxx-xxx-xxxx-xxxxxxxxxx
        TenantName : xxxxxxx-xxxx-xxx-xxxx-xxxxxxxxxx
       AuthCodeUrl : https://login.microsoftonline.com/xxxxxxx-xxxx-xxx-xxxx-xxxxxxxxxx/oauth2/authorize
    AccessTokenUrl : https://login.microsoftonline.com/xxxxxxx-xxxx-xxx-xxxx-xxxxxxxxxx/oauth2/token
            MdmUrl :
         MdmTouUrl :
  MdmComplianceUrl :
       SettingsUrl :
    JoinSrvVersion : 1.0
        JoinSrvUrl : https://enterpriseregistration.windows.net/EnrollmentServer/device/
         JoinSrvId : urn:ms-drs:enterpriseregistration.windows.net
     KeySrvVersion : 1.0
         KeySrvUrl : https://enterpriseregistration.windows.net/EnrollmentServer/key/
          KeySrvId : urn:ms-drs:enterpriseregistration.windows.net
      DomainJoined : YES
        DomainName : CORP

+----------------------------------------------------------------------+
| User State                                                           |
+----------------------------------------------------------------------+

            NgcSet : NO
   WorkplaceJoined : NO
     WamDefaultSet : NO
        AzureAdPrt : NO

+----------------------------------------------------------------------+
| Ngc Prerequisite Check                                               |
+----------------------------------------------------------------------+

     IsUserAzureAD : NO
     PolicyEnabled : NO
    DeviceEligible : YES
SessionIsNotRemote : NO
  X509CertRequired : NO
      PreReqResult : WillNotProvision
Switch back to the Remote Desktop session to DC1, in the Edge browser window displaying the Azure portal, navigate to the Devices - All devices blade of the Contoso Azure AD tenant and verify that there is an entry representing the APP1 server, with the Join Type set to Hybrid Azure AD joined.
Note: You might need to wait until the Azure AD registration status is correctly reported and its Azure AD object appears in the Azure portal.

Summary
In this exercise, you integrated an Active Directory forest with an Azure Active Directory tenant by creating an Azure Active Directory tenant and activating an Enterprise Mobility + Security E5 trial, creating and configuring an Azure AD user, purchasing a custom domain name, assigning a custom domain name to the Contoso Azure AD tenant, configuring DNS suffix in the Contoso Active Directory forest, installing Azure AD Connect, enable Active Directory Recycle Bin, configuring Azure AD Connect attribute-level filtering, initiating and verifying directory synchronization, configuring Hybrid Azure AD join, and performing Hybrid Azure AD join of a Windows Server 2016 VM.
Duration: 150 minutes
Overview
In this exercise, you will optimize authentication, authorization, and access control for Contoso Active Directory environment integrated with the Contoso Azure AD tenant by enabling Azure AD Multi-Factor Authentication, enabling Azure AD password writeback and Self-Service Password Reset, implementing Azure AD Password Protection, enabling Azure Active Directory Identity Protection, enabling Automatic Intune Enrollment, as well as implementing Azure AD Privileged Identity Management and Azure AD Conditional Access Policies.
In this task, you will create and configure Active Directory groups that will be used to control authentication, authorization, and access control and synchronize them to the Contoso Azure AD tenant.
Within the Remote Desktop session to DC1, on the Server Manager window, under Tools, start the Active Directory Users and Computers console.
In the Active Directory Users and Computers console, expand corp.contoso.com on the left and navigate to Demo Accounts > Groups.

In the Groups directory, right-click, select New, and select Group. Create a new group with the following settings and select OK:
Group name: Engineering - Mandatory MFA
Group name (pre-Windows 2000): Engineering - Mandatory MFA
Group scope: Global
Group type: Security

Open the Properties window of the Engineering - Mandatory MFA group; in the Description text box, type Engineering users with user state-based MFA enforcement (without Conditional Access) then select OK.

Within the Remote Desktop session to DC1, open Visual Studio Code and run the following to add designated users to the newly created group (replace the placeholder <custom_domain_name> with the actual name of the custom verified domain name you assigned to the Contoso Azure AD tenant).
$domainName = '<custom_domain_name>'
$users = Get-ADGroupMember -Identity 'Engineering' -Recursive | Where-Object {($_.objectClass -eq 'user') -and ($_.distinguishedName -like "*OU=NY,OU=US,OU=Users,OU=Demo Accounts,DC=corp,DC=contoso,DC=com")}
foreach ($user in $users) {
    $user = Get-ADUser -Identity $User.SamAccountName
    Add-ADGroupMember -Identity 'Engineering - Mandatory MFA' -Members $user
}
Open a Windows PowerShell console, and start Azure AD Connect delta synchronization by running the following:
Start-ADSyncSyncCycle -PolicyType DeltaIn the Remote Desktop session to DC1, in the Edge browser window displaying the Azure portal, navigate to the Contoso - Overview blade of the Contoso Azure AD tenant and select Groups on the left.
On the Groups - All groups blade, verify there is an entry representing the Engineering - Mandatory MFA group containing the Azure AD user accounts matching Active Directory user accounts, which are members of the Active Directory Engineering - Mandatory MFA group.

In this task, you assign a value to each user account’s UsageLocation attribute and assign an Azure AD Premium license to each user. This is necessary to implement Azure AD-based Multi-Factor Authentication for these users.
Within the Remote Desktop session to DC1, open a Windows PowerShell console, and run the following to install the Azure AD Graph PowerShell module for Graph (select Yes to All when prompted whether to proceed with the installation):
Install-Module -Name Microsoft.GraphOpen a Windows PowerShell console, and run the following to sign into the Contoso Azure AD tenant. When prompted, sign in with the john.doe Azure AD user account, which you created in the previous exercise. Accept any permission requests that pop up when logging in.
Connect-MgGraph -Scope "Directory.ReadWrite.All"In the Windows PowerShell console, run the following to set the Location attribute to the United States for all Azure AD user accounts with the UPN suffix matching the custom verified domain name of the Contoso Azure AD tenant.
$domainName = (Get-MgDomain | Where-Object IsDefault -eq 'True').Id
Get-MgUser | Where-Object {$_.UserPrincipalName -like "*@$domainName"} | ForEach-Object {Update-MgUser -UserId $_.UserPrincipalName -UsageLocation 'US'}
In the Windows PowerShell console, run the following to assign the EM+S E5 trial licenses to all Azure AD user accounts with the UPN suffix matching the custom verified domain name of the Contoso Azure AD tenant.
$skuID = (Get-MgSubscribedSku | Where-Object {$_.SkuPartNumber -eq 'EMSPREMIUM'}).SkuId
$users =  Get-MgUser | Where-Object {$_.UserPrincipalName -like "*@$domainName"}
foreach($user in $users) {
    Set-MgUserLicense -UserId $user.UserPrincipalName -AddLicenses @{SkuId = $skuID} -RemoveLicenses @()
}This task will enable password writeback and Self-Service Password Reset (SSPR) for Contoso users that had their accounts synchronized to the Contoso Azure AD tenant.
Within the Remote Desktop session to DC1, double-click the Azure AD Connect desktop shortcut.
On the Welcome to Azure AD Connect page, select Configure.
On the Additional tasks page, select Customize synchronization options and select Next.
On the Connect to Azure AD page, sign in by using the credentials of the john.doe account and select Next.

On the Connect your directories page, select Next.
On the Domain and OU filtering page, select Next.
On the Optional features page, check the Password writeback box and select Next.
On the Enable single sign-on page, select Next.
On the Ready to configure page, ensure that the Start the synchronization process when configuration completes checkbox is selected, and select Configure.

On the Configuration complete page, select Exit.
Within the Remote Desktop session to DC1, in the Edge browser window displaying the Azure portal, navigate to the Contoso - Overview blade of the Contoso Azure AD tenant.
On the Contoso - Overview blade, select Password reset on the left under Manage.
On the Password reset - Properties blade, set Self-service password reset enabled to Selected, choose No groups selected. On the Default password reset policy blade that appears on the right, select Engineering, choose Select, and select Save.
On the Password reset - Properties blade, select Authentication methods on the left under Manage.
On the Password reset - Authentication methods blade, set Number of methods required to reset to 2, enable all Methods available to users, including Mobile app notification, Mobile app code, Email, Mobile phone (SMS only), and Security questions.

Note: The Office phone method is not available in trial subscriptions.
Set Number of security questions required to register and Number of questions required to reset to 3.

Choose No security questions configured. On the Select security questions blade that appears, select + Predefined. On the Add predefined security questions blade that appears on the right, select any five questions, select OK twice, and, back on the Password reset - Authentication methods blade, select Save.

On the Password reset - Authentication methods blade, select Registration on the left and ensure that Require users to register when signing in is set to Yes and that Number of days before users are asked to re-confirm their authentication information is set to 180.
On the Password reset blade, select On-premises integration on the left and verify that the Write back passwords to your on-premises directory setting is set to Yes. Note that you can Allow users to unlock accounts without resetting their passwords.

In this task, you will implement Azure AD password protection for Windows Server Active Directory.
Within the Remote Desktop session to DC1, on the Server Manager window, under Tools, start the Group Policy Management console.
In the Group Policy Management console, navigate to Forest: corp.contoso.com > Domains > corp.contoso.com on the left, right-click Default Domain Policy and select Edit.

In the Group Policy Management Editor, navigate to Computer Configuration > Policies > Windows Settings > Security Settings > Account Policies > Account Lockout Policy.
Set the value of the Account lockout threshold to 10, select OK, and accept the settings in the Suggested Value Changes.

Within the Remote Desktop session to DC1, in the Edge browser window displaying the Azure portal, navigate to the Contoso - Overview blade of the Contoso Azure AD tenant.
On the Contoso - Overview page, select Security under Manage on the left navigation pane.
On the Security - Getting started page, select Authentication methods under Manage on the left navigation pane.
On the Authentication methods - Policies page, select Password protection under Manage on the left navigation page.
On the Authentication methods - Password protection page, specify the following settings and select Save:
Lockout threshold: 5
Lockout duration in seconds: 3600
Enforce custom list: Yes
Custom banned password list: Contoso, password, pass (type each word on a separate line without commas).
Enable password protection on Windows Server Active Directory: Yes
Mode: Audit

Switch to the Remote Desktop session to APP1 virtual machine, where you are signed in as the user AGAyers with the demo@pass123 password.
Launch Internet Explorer. Select the cogwheel, and then Internet Options.

Select the Security tab, leave Internet selected, then select Custom level…

Scroll almost halfway down and Enable File download. Select OK, confirm changing the settings, and select OK.

Now that file downloads are allowed on APP1, use Internet Explorer to download and install Edge for Windows 64-bit from the following URL:
https://www.microsoft.com/en-us/edge/business/download
Start the Edge browser once it’s installed, navigate to the Azure AD Password Protection for Windows Server Active Directory page at the below-listed URL. Select Download under Azure AD Password Protection for Windows Server Active Directory. Download and install AzureADPasswordProtectionProxySetup.exe with the default options.
https://www.microsoft.com/download/details.aspx?id=57071Within the Remote Desktop session to APP1, start a Windows PowerShell console as Administrator. Next, run the following to register the proxy (replace the <domain_name> placeholder with the name of the default domain name associated with the Contoso Azure AD tenant). When prompted, sign into the Contoso Azure AD tenant using the credentials of the john.doe user account.
Import-Module AzureADPasswordProtection
Register-AzureADPasswordProtectionProxy -AccountUpn 'john.doe@<domain_name>.onmicrosoft.com'
In the same Windows PowerShell console session, run the following to register the Active Directory forest (replace the <domain_name> placeholder with the name of the default domain name associated with the Contoso Azure AD tenant) if you get a login prompt, use john.doe account again. Neither of these commands will display any output if they execute successfully.
Register-AzureADPasswordProtectionForest -AccountUpn 'john.doe@<domain_name>.onmicrosoft.com'Switch to the Remote Desktop session to the DC1 virtual machine, where you are signed in as the user CORP* with the demo@pass123** password.
Within the Remote Desktop session to DC1, start the Edge browser and navigate to the Azure AD Password Protection for Windows Server Active Directory page at the URL below. Select Download under Azure AD Password Protection for Windows Server Active Directory. Download and install AzureADPasswordProtectionProxySetup.exe with the default options.
https://www.microsoft.com/download/details.aspx?id=57071Restart DC1 once the setup completes.
In this task, you will enable Azure AD Identity Protection.
After DC1 reboots, connect to DC1 via Remote Desktop. When prompted to sign in, use the demouser name with the demo@pass123 password.
Within the Remote Desktop session to DC1, start the Edge browser and navigate to the Azure portal at the URL below:
portal.azure.comWhen prompted to sign in, enter the credentials of the john.doe Azure AD user account, which you copied into Notepad earlier in this exercise.
In the Azure portal, search for and select Azure AD Identity Protection in the search bar at the top of the page.

On the Azure AD Identity Protection blade, select MFA registration policy in the left navigation under Protect.
On the Azure AD Identity Protection - MFA registration policy blade, in the Assignments section, select All users.

On the Include tab that opens on the right, choose Select individual users and groups. Then, on the Select users blade, in the Select text box, type Engineering, in the list of results, select Engineering and choose Select.

On the Exclude tab, choose 0 users and groups selected. On the Select users blade, in the Select text box, type Engineering - Mandatory MFA, in the list of results, select Engineering - Mandatory MFA, choose Select.

Back on the Azure AD Identity Protection - MFA registration policy blade, in the Controls section, ensure that the Require Azure MFA registration checkbox is selected. Set Enforce Policy to On and select Save.

On the Azure AD Identity Protection blade, select User risk policy on the left under Protect.
On the Azure AD Identity Protection - User risk policy blade, configure the User risk remediation policy with the following settings and save your configuration:
Assignments:
Users: All users
User risk: Low and above
Controls:
Enforce Policy: On

In this task, you will enable automatic enrollment of hybrid Azure AD devices into Intune.
Within the Remote Desktop session to DC1, in the Edge browser window displaying the Azure portal, navigate to the following URL in a tab.
https://endpoint.microsoft.comOn the Microsoft Endpoint Manager admin center page, select Devices on the left navigation.
On the Devices blade, select Enrolled devices under Device enrollment on the left.
On the Windows enrollment blade, select Automatic Enrollment.
On the Configure blade, set MDM user scope to All and select Save.

Within the Remote Desktop session to DC1, in the Edge browser tab displaying the Azure portal, navigate to the blade of the Contoso Azure AD tenant.
On the Contoso - Overview page, select Devices under Manage on the left.
On the Devices - All devices page, select Enterprise State Roaming on the left.
On the Devices - Enterprise State Roaming blade, for Users may sync settings and app data across devices, select Selected. Choose No member selected below. Select + Add, then select the Engineering group from the list of Azure AD tenant users and groups that appear on the right. Choose Select, then Ok, then Save.

In this task, you will implement Azure AD Conditional Access Policies.
Within the Remote Desktop session to DC1, in the Edge browser tab displaying the Azure portal, navigate to the Contoso - Overview blade of the Contoso Azure AD tenant.
On the Contoso - Overview blade, select Properties under Manage on the left. Select Manage Security defaults. On the Enable security defaults blade that appears on the right, select No under Enable security defaults then check My organization is using Conditional Access. Then select Save. Return to the Contoso - Overview blade.

On the Contoso - Overview page, select Security under Manage in the left navigation pane.
On the Security - Getting started page, select Named locations under Manage in the left navigation pane.
On the Security - Named locations page, select + IP ranges location in the left navigation pane.
On the New location (IP ranges) blade, specify the name Contoso Headquarters.
Select the Mark as trusted location checkbox, then select +.

Add the public IP address of the APP1 Azure VM (the IP address can be found on the VM page in the portal) in the CIDR notation (i.e., x.x.x.x/32). Then select Create.

Select Conditional Access under Protect in the left navigation pane.
On the Conditional Access - Policies page, select + New policy and Create new policy from templates. The first policy will enforce MFA for the Engineering - Mandatory MFA group.
Leave Identities selected and select Next.

Select Require multi-factor authentication for all users, Name your policy Require multi-factor authentication for Engineering Mandatory MFA, set the Policy state to On, select Next, and then Create Policy.

Once the policy is created, select it to make an update.
Select All users included and specific users excluded under Users or workload identities. Change from All users to Select users and groups, select the Users and groups checkbox, and select the group Engineering - Mandatory MFA.

Select the Exclude tab and notice that when we create a conditional access policy from a template, the user creating the policy (in this case, john.doe) is automatically added to the exclude list to ensure the user isn’t locked out of their Azure AD tenant. Select Save.
Select + New policy then Create new policy. A second policy will be created for the rest of the engineering users.
On the New blade, in the Name text box, type Contoso Engineering On-Premises Conditional Access Policy.
On the New blade, in the Assignments section, select 0 users or workload identities selected.
On the Include tab, choose the Select users and groups option and select the Users and groups checkbox. On the Select blade, type Engineering, in the list of results, select Engineering, and choose Select.

On the Exclude tab, select the Users and groups checkbox. On the Select excluded users blade, type Engineering. In the list of results, select Engineering - Mandatory MFA, and choose Select.

On the New blade, in the Assignments section, select No cloud apps, actions, or authentication contexts selected.
On the Include tab that appears, choose the Select apps option. On the Select blade, select the Microsoft Azure Management checkbox, choose Select.
![In this screenshot, the Include tab is depicted with the ‘Select apps’ option selected, and the Select blade is open with the ‘Microsoft Azure Management’ a[[]] searched for and selected along with the Select button.](images/Hands-onlabstep-bystep-HybridIdentityImages/media/AzureADConditionalAccess_CloudppsandActionsInclude.png "Select the Microsoft Azure Management app")
Note: Review the warning stating Don’t lock yourself out! This policy impacts the Azure portal. Before you continue, ensure that you or someone else will be able to get back into the portal. Disregard this warning if configuring a persistent browser session policy that works correctly only if “All cloud apps” are selected.
On the New blade, in the Conditions section, select 0 conditions selected. Select Not configured under Sign-in risk. In the Sign-in risk blade, set Configure to Yes, check the No risk box, and choose Done.

Select Not configured under Device platforms. On the Device platforms blade, set Configure to Yes, on the Include tab, choose Select device platforms. Check the Windows box, and select Done.

Select Not configured under Locations. On the blade that appears, set Configure to Yes. On the Include tab, choose Selected locations. On the Select blade, check the Contoso Headquarters box, choose Select.

Select Not configured under Client apps, on the Client apps blade, set Configure to Yes. Check the Browser, Mobile apps and desktop clients, Exchange ActiveSync clients, and Other clients boxes, and select Done.

Back on the New blade, in the Access controls section, select 0 controls selected under Grant.
On the Grant blade, ensure that the Grant access option is selected. Next, check the Require Hybrid Azure AD joined device box, accept the default choice of Require all the selected controls under For multiple controls, and choose Select.
Note: Review the warning Don’t lock yourself out! Make sure that your device is Hybrid Azure AD Joined.

Back on the New blade, in the Access controls section, select 0 controls selected under Session.
Review the Session blade settings but do not modify them. Close it when you are finished.
On the New blade, set Enable policy to On and select Create.

Back on the Conditional Access - Policies blade, select What If.
On the What If blade, specify the following settings, and select What If:
User: Teresa F. Bell
Cloud apps or actions: Microsoft Azure Management
IP address: The public IP address of the APP1 Azure VM
Country or region: United States
Device platform: Windows
Client apps: Browser
Sign-in risk: No risk
Review the evaluation results and note the policy and the grant controls that will apply.

Re-run the evaluation, but first, change the Sign-in risk to Low. Review the evaluation results.
In this task, you will implement Azure AD Privileged Identity Management.
Within the Remote Desktop session to DC1, in the Edge browser window displaying the Azure portal, navigate to the All services blade.
In the search text box, type Privileged Identity Management and, in the list of results, select Azure AD Privileged Identity Management.

On the Privileged Identity Management page, select Azure AD roles under Manage on the left.

On the Contoso - Quick start page, select Assign eligibility.

On the Contoso - Roles page, select + Add assignments.

On the Add assignments blade, specify the following settings to designate Ann G. Ayers as an eligible member of the Authentication Administrator role, then select Next then Assign.
Select role: Authentication Administrator
Select members: Ann G. Ayers
Note: Authentication Administrator role grants privileges to set or reset non-password credentials and update passwords for all users. Authentication Administrators can require users to re-register against existing non-password credentials (for example, MFA or FIDO) and revoke remember MFA on the device, which prompts MFA on the next sign-in.

On the Contoso - Roles blade, select Assignments under Manage on the left and note that Ann G. Ayers is eligible for the Authentication Administrator role.

Switch to the Remote Desktop session to APP1, start the Edge browser, and browse to the Azure portal at http://portal.azure.com. From here, sign in as Ann G. Ayers. The username can be found on the Users - All users page in the Azure portal window on the lab computer. The password will be demo@pass123.
Note: If prompted that you have 14 days to add additional information, you can still choose to skip. Even if you decide to skip here, on the next screen, you’ll be required to enter additional MFA information.
When prompted to provide additional information, select Next on the Keep your account secure page, and select I want to set up a different method. At the Choose a different method dialog, select Phone on the dropdown, then select Confirm.
On the Phone page, enter your phone number and select Next.
Enter the code from the text you received, and select Next.
When prompted again to provide additional information, select Next. On the Keep your account secure page, select I want to set up a different method. At the Choose a different method dialog, select Email on the dropdown, then select Confirm.
On the Email page, enter an email address you can access and select Next.
Enter the code in the text message you received, and select Next.
Back on the Keep your account secured page, select Done. You will now be able to use the Azure portal.
In the Azure portal, navigate to the Privileged Identity Management - Quick start page.
On the Privileged Identity Management - Quick start page, select My roles under Tasks on the left.

On the My roles - Azure AD roles page, on the Eligible assignments tab, select Activate next to the Authentication Administrator role entry.

On the Activate - Authentication Administrator blade, enter random text in the Reason box, then select Activate. Wait for the role to activate and the page to refresh.

Switch to the Active assignments tab, and note that the role assignment has been activated.

Summary
In this exercise, you optimized authentication, authorization, and access protection for Contoso Active Directory environment integrated with the Contoso Azure AD tenant by enabling Azure AD Multi-Factor Authentication, enabling Azure AD password writeback and Self-Service Password Reset, implementing Azure AD Password Protection, enabling Azure Active Directory Identity Protection, enabling Automatic Intune Enrollment, as well as implementing Azure AD Privileged Identity Management and Azure AD Conditional Access Policies.
Duration: 90 minutes
Overview
In this exercise, you will configure access to an on-premises Integrated Windows Authentication app (implemented as the default IIS website) from the internet by installing and configuring Azure AD Application Proxy. You will test access to this application by using a Contoso Azure AD tenant user account and using a Fabrikam Azure AD tenant user account configured as a guest account in the Contoso Azure AD tenant.
In this task, you will install and configure Azure AD Application Proxy.
Within the Remote Desktop session to DC1, in the Edge browser window displaying the Azure portal, navigate to the Contoso - Overview blade of the Contoso Azure AD tenant.
On the Contoso - Overview blade of the Contoso Azure AD tenant, select Application proxy under Manage on the left.
On the Contoso - Application proxy blade, select Download connector service.
On the Application Proxy Connector Download blade on the right, review the system requirements and select Accept terms & Download.
When prompted whether to save or run AADApplicationProxyConnectorInstaller.exe, select Open file.

Note: In a production environment, you would install the connector on a domain member server. We are using a domain controller strictly for simplicity.
Install Microsoft Azure Active Directory Application Proxy Connector with default settings. When prompted to sign in, enter the credentials of the john.doe Azure AD user account, which you created in the first exercise of this lab.
Once the installation completes, refresh the Edge browser page displaying the Contoso - Application proxy blade and verify that it includes the DC1.corp.contoso.com entry in the Default connector group.
On the Contoso - Application proxy blade, select Enable application proxy and, when prompted for confirmation, select Yes.

In this task, you will configure an Azure AD Application Proxy application.
On the Contoso - Application proxy blade, select + Configure an app.
On the Add your own on-premises application blade, specify the following settings, and select + Add.
Name: APP1 Default Web Site
Internal URL: http://app1.corp.contoso.com
External URL: Accept the default value.
Pre Authentication: Azure Active Directory
Connector Group: The Default group option. This may also have a country or region along with Default
Backend Application Timeout: Default
Use HTTP-Only Cookie: No
Use Secure Cookie: Yes
Use Persistent Cookie: No
Translate URLs in Headers: Yes
Translate URLs in Application Body: No

In the search bar at the top of the Azure portal, search for and select Enterprise applications. Then, in the list of applications, select APP1 Default Web Site.
On the APP1 Default Web Site - Overview blade, in the Getting Started section, select Assign users and groups.

On the APP1 Default Web Site - Users and groups blade, select + Add user/group.
On the Add Assignment blade, specify the following settings, and select Assign:
Users and groups: Engineering
Select Role: User

On the APP1 Default Web Site - Users and groups blade, select Single sign-on under Manage on the left.
On the APP1 Default Web Site - Single sign-on blade, select Windows Integrated Authentication.
Within the Remote Desktop session to DC1, start a Command Prompt. In the Command Prompt, run the following to identify Service Principal Names associated with the APP1 computer account.
setspn -L APP1Review the output, switch back to the Edge browser window displaying the Azure portal, and, on the APP1 Default Web Site - Configure Integrated Windows Authentication (IWA) blade, specify the following settings and select Save.
Internal Application SPN: HTTP/APP1.corp.contoso.com
Delegated Login Identity: User principal name

Note: The HTTP service class is one of the built-in services that act as an alias to the HOST SPN. For more information, refer to How to use SPNs when you configure Web applications that are hosted on Internet Information Services at https://support.microsoft.com/en-us/help/929650/how-to-use-spns-when-you-configure-web-applications-that-are-hosted-on.
Within the Remote Desktop session to DC1, in the Server Manager console, select Tools and then select Active Directory Users and Computers.
In the Active Directory Users and Computers console, select View and, in the View menu, enable Advanced Features.

In the Active Directory Users and Computers console, locate the computer account hosting the Azure AD Application Proxy connector (DC1 in our case) under Domain Controllers within corp.contoso.com and display its Properties window.

In the DC1 Properties window, switch to the Delegation tab, select the option Trust this computer for delegation to specified services only, select the option Use any authentication protocol, then select Add.

In the Add Services window, select Users or Computers. In the Select Users or Computers dialog box, in the Enter the object names to select text box, type APP1. Select Check Names to verify the name resolves, and select OK.

In the Add Services window, select the http entry and select OK.

In the DC1 Properties window, select OK.
From the lab computer, start a browser in Private mode and browse to the URL below. When prompted to sign in, use the AGAyers@
https://myapps.microsoft.comIf prompted for MFA, use either the phone number or email you entered in the previous exercise to complete the MFA prompt.
On the Apps page of the Application Access Panel, select the APP1 Default Web Site icon. This will automatically open a new browser tab displaying the Default Web Site page on APP1.
In this task, you will create another Azure Active Directory tenant representing the Fabrikam organization with the following settings:
Organization name: Fabrikam
Initial domain name: Any valid, unique domain name.
Country or region: United States
From the lab computer, start a new Web browser window and navigate to the Azure portal at https://portal.azure.com.
When prompted, sign in to the Azure subscription into which you deployed resources in the Before Hands-On Lab exercises (the Default Directory).
On the lab computer, in the Azure portal, expand the left navigation and select + Create a resource.
On the New blade, in the Search the Marketplace text box, type Azure Active Directory and, in the list of results, select Azure Active Directory.
On the Azure Active Directory blade, select Create and Azure Active Directory.
On the Basics tab, leave Azure Active Directory selected and select Next: Configuration.
On the Configuration tab, enter the following settings. Then select Review + create and then Create.
Organization name: Fabrikam
Initial domain name: Any valid, unique domain name.
Country or region: United States

After the tenant has been created, select Fabrikam to navigate to the newly created tenant.

On the Fabrikam - Overview page, select Licenses on the left.
On the Licenses - Overview, page, select All Products under Manage on the left. Then select + Try/Buy.
On the Activate page, in the ENTERPRISE MOBILITY + SECURITY E5 section, select Free trial and then select Activate.

In this task, you will configure Azure AD user accounts in the newly created Azure AD tenant. This will include assigning EM+S E5 licenses to the user account you are using for this lab, creating a new Azure AD user account with the following settings, and assigning it the Global Administrator role and an EM+S E5 license.
From the lab computer, in the Azure portal, navigate back to the Fabrikam - Overview page.
On the Fabrikam - Overview page, select Users under Manage.
Select the entry representing your user account on the Users - All users page.
On the Profile page of your user account, in the Settings section, select Edit.

In the Settings section, in the Usage location dropdown list, select the United States entry and select Save.

On the user account’s Profile page, select Licenses under Manage on the left.
On the Licenses page, select + Assignments.
On the Update license assignments page, check the Enterprise Mobility + Security E5 box, ensure all the corresponding license options are enabled, and select Save.
On the Users - All users page, select + New user.
On the New user page, ensure that the Create user option is selected, specify the following settings, and select Create:
Note: Copy the User name and Password values into Notepad. You will need them later in this lab.
User name: jane.doe@your Azure AD tenant domain name where your Azure AD tenant domain name is the domain name you specified when creating the Fabrikam Azure AD tenant in the previous task.
Name: jane.doe
First name: Jane
Last name: Doe
Password: Auto-generate password
Show Password: Enabled
Groups: 0 group selected
Roles: Global Administrator
Block sign in: No
Usage location: United States
Job title: Leave blank
Department: Leave blank

On the Users - All users page, select the entry representing the newly created user account.
On the jane.doe - Profile page, select Licenses under Manage on the left.
On the jane.doe - Licenses page, select + Assignments.
On the Update license assignments page, check the Enterprise Mobility + Security E5 box, ensure all the corresponding license options are enabled, and select Save.

In this task, you will create and configure Azure AD guest accounts in the Contoso Azure AD tenant representing users in the Fabrikam Azure AD tenant.
Switch to the Remote Desktop session to DC1; in the Edge browser, navigate to the Contoso - Overview blade of the Contoso Azure AD tenant. Make sure you’re signed in with the john.doe account.
On the Contoso - Overview page, select Users under Manage on the left.
On the Users - All users page, select + New user and then Invite external user.

On the New user page, ensure that the Invite user option is selected, specify the following settings, and select Invite:
Name: fabrikam-jane.doe
Email address: The email address of the jane.doe user you created earlier.
First name: Jane
Last name: Doe
Personal message: Welcome to the Contoso Azure AD tenant
Groups: 0 groups selected
Roles: User
Block sign in: No
Usage location: United States
Job title : Not set
Department : Not set

In the Azure portal, navigate back to the Contoso - Overview blade of the Contoso Azure AD tenant and select Groups under Manage on the left.
On the Groups - All groups page, select New group.
On the New group page, specify the following settings, and select Create:
Group type: Security
Group name: Fabrikam B2B users
Group description: Fabrikam B2B users
Azure AD roles can be assigned to the group: No
Membership type: Assigned
Owners: No owners selected
Members: fabrikam-jane.doe

On the Groups - All groups blade, select the newly created group and, on the Fabrikam B2B users group, copy its Object id value and paste it into Notepad. You will need it later in this exercise.

Switch to the lab computer, start a web browser using in private/incognito mode and browse to https://portal.azure.com/
When prompted, sign in by using the credentials of the jane.doe Fabrikam Azure AD user account.
When prompted, grant the Contoso Azure AD tenant requested permissions by selecting Accept.
When prompted, change the password for the jane.doe Fabrikam Azure AD user account.
Note: If you receive the message, “We’ve seen that password too many times before. Choose something harder to guess”, you will need to modify the password until it is unique enough to be accepted.

In the Azure portal, sign out from the Contoso Azure AD tenant and close the in private/incognito browser window.
In this task, you will configure an Azure AD Application Proxy application for B2B access.
Within the Remote Desktop session to DC1, in the Edge browser window displaying the Azure portal, navigate to the Contoso - Overview page of the Contoso Azure AD tenant.
On the Contoso - Overview page of the Contoso Azure AD tenant, select Enterprise applications under Manage on the left.

On the Enterprise applications - All applications page, select APP1 Default Web Site.

On the APP1 Default Web Site - Overview page, select Users and groups under Manage on the left-side navigation.
On the APP1 Default Web Site - Users and groups page, select + Add user/group.

On the Add Assignment page, specify the following settings and select Assign:
Users and groups: jane.doe
Select Role: User

Within the Remote Desktop session to DC1, in the Azure portal, navigate back to the Contoso - Overview blade of the Contoso Azure AD tenant.
On the Contoso - Overview page, select App registrations under Manage on the left.
On the Contoso - App registrations page, select + New registration.
On the Register an application page, specify the following information and select Register:
Name: Sync B2B users
Supported account types: Accounts in this organizational directory only (Contoso only - Single-tenant)
Redirect URI (Optional): Web and https://loopback

You will be automatically redirected to the Sync B2B users page.
On the Sync B2B users page, select API permissions under Manage on the left.
On the Sync B2B users - API permissions page, in the Configured permissions section, select + Add a permission.
On the Request API permission blade that appears on the right, switch to the APIs my organization uses tab. In the search text box, type Windows Azure Active Directory. In the list of results, select Windows Azure Active Directory, and then select Application permissions.

On the Request API permissions blade, in the Select permissions section, expand the Directory subsection, check the Directory.Read.All box, and select Add permissions.

Back on the Sync B2B users - API permissions page, in the Configured permissions section, select Grant admin consent for Contoso. Select Yes when prompted.
If prompted, sign in with the credentials of the john.doe Contoso Azure AD user account and, on the Permissions requested Accept for your organization page, select Accept.
Review the status of the permissions listed in the Configured permissions section on the Sync B2B users - API permissions blade and ensure that they are listed as Granted for Contoso.

On the Sync B2B users - API permission page, select Certificates & secrets under Manage on the left, select + New client secret, and on the Add a client secret page, specify the following information and select Add.
Description: Sync B2B users secret 1
Expires: 12 months 
Copy the resulting secret value. You will need it later in this task.
Note: This value will not be displayed again and cannot be retrieved once you navigate away from the current page. If you lose it, you will have to delete the secret and create another one.
On the Sync B2B users blade, select Overview on the left.
On the Sync B2B users - Overview blade, note the values of the Application (client) ID and Directory (tenant) ID. You will need them later in this task.

Within the Remote Desktop session to DC1, switch to the Active Directory Users and Computers console.
In the Active Directory Users and Computers console, expand corp.contoso.com on the left. Create an organizational unit named Demo B2B Accounts directly in the root of the domain with two child organizational units named Enabled and Disabled.

Note: These OUs must NOT be synchronized back to the Azure AD tenant using Azure AD Connect. Make sure not to include the guest user objects in the synchronization scope.
Within the Remote Desktop session to DC1, open a Windows PowerShell console and run the following to add a suffix matching the default DNS name of the Contoso Azure AD tenant (replace the <domain_name> placeholder with the name of the default domain name associated with the Contoso Azure AD tenant):
Get-ADForest | Set-ADForest -UPNSuffixes @{Add="<domain_name>.onmicrosoft.com"}Within the Remote Desktop session to DC1, start the Edge browser and browse to the following URL.
https://www.microsoft.com/en-us/download/details.aspx?id=51495On the Connectors for Microsoft Identity Manager 2016 SP1 and Forefront Identity Manager 2010 R2 SP1 page, download Script and Readme to pull Azure AD B2B users on-prem_v1.0.3.zip and extract its content. You’ll have to scroll down to find it.

Once the files are extracted, right-click on the PowerShell script, open the file properties, and Unblock the script.
Within the Remote Desktop session to DC1, in Visual Studio Code, open the newly extracted PowerShell script AppProxy-GuestAccountCreation-v1.0.3.ps1 and modify its content by updating it to match the following:
Note: If you can’t open the file for some reason, you can use the Open folder option in Visual Studio Code to open the folder containing the script.
$B2BGroupSid = "TODO" #Fabrikam B2B users Azure AD group's ObjectID that you identified earlier in this exercise.
$ShadowAccountOU = "OU=Enabled,OU=Demo B2B Accounts,DC=corp,DC=contoso,DC=com" #Organizational Unit for placing shadow accounts
$ShadowAccountOUArchive = "OU=Disabled,OU=Demo B2B Accounts,DC=corp,DC=contoso,DC=com" #Organizational Unit for moving disabled shadows

# Requires Azure AD configuration - refer to the documentation
$appID = "TODO" #The value of the Client ID parameter of the Sync B2B user application you identified earlier in this exercise
$appSecret = "TODO" #The value of the secret of the Sync B2B user application you identified earlier in this exercise
$tenantdomain   = "TODO" #The name of the default domain name associated with the Contoso Azure AD tenant
$tenantID = "TODO" #The value of the Azure AD tenant ID parameter of the Sync B2B user application you identified earlier in this exerciseNote: For more information regarding the script and its implementation, refer to the Readme - Script to pull Azure AD B2B users on-prem_v1.0.3.pdf file, included in the 1.1.953.0and Readme to pull Azure AD B2B users on-prem_v1.0.3.zip file you downloaded earlier in this task.
Install the AzureAD PowerShell Module using the script below. Confirm any prompts while installing it.
Install-Module AzureADExecute the script and ensure it did not return any error messages.
Note: You can schedule script execution regularly by using Windows Scheduled Tasks. Refer to the Readme - Script to pull Azure AD B2B users on-prem_v1.0.3.pdf file for details.
Switch back to the Azure Active Directory Users and Computers console and verify that a user account of jane.doe is listed in the Demo B2B Accounts\Enabled organizational unit. You may have to refresh the console.
Note: In a production environment, you could provide access to Integrated Windows Authentication apps by leveraging Microsoft Identity Manager. You can also give access to on-premises apps that support SAML-based authentication directly from the Azure portal. Refer to Grant B2B users in Azure AD access to your on-premises applications at https://docs.microsoft.com/en-us/azure/active-directory/b2b/hybrid-cloud-to-on-premises for more information.

On the lab computer, start a browser in Private mode and go to the URL below:
https://myapps.microsoft.comWhen prompted, sign in by using the jane.doe Fabrikam Azure AD user account.
Once signed in, select the Jane Fabrikam icon in the upper right corner of the Application Access Panel page and, in the dropdown menu, select Switch organization.
Select the Contoso Organization.
On the Apps page of the Application Access Panel, select the APP1 Default Web Site icon. This will automatically open a new browser tab displaying the Default Web Site page on APP1.
Summary
In this exercise, you configured access to the on-premises Integrated Windows Authentication app (implemented as the default IIS website) from the internet by installing and configuring Azure AD Application Proxy. You also tested access to this application by using a Contoso Azure AD tenant user account and a Fabrikam Azure AD tenant user account configured as a guest account in the Contoso Azure AD tenant.
Duration: 90 minutes
Overview
In this exercise, you will configure a secondary domain controller and install Azure AD Connect in standby mode for failover. You will also configure a second pass-through agent and application proxy on the secondary domain controller.
In this task, you will create a VM that will become the backup domain controller within the hybrid infrastructure.
From within the Azure portal, select + Create a resource, select Compute, and select Create under Virtual machines.

Complete the following information for the Virtual machine and select Next: Disks:
Resource group: hybrididentity-RG
Virtual machine name: BDC-1
Image: Windows Server 2016 Datacenter - Gen 1
Size: Standard D2ads v5
Username: demouser
Password: demo@pass123
Public inbound ports: Allow selected ports
Select inbound ports: RDP (3389)

Set the OS Disk type to Standard SSD.
Select Create and attach a new disk.
On the Create a new disk tile, select Change size and change the disk size to 32 GB. Check the box to Delete disk with VM.
Select OK to continue.

Select Next: Networking and verify the Virtual network is TlgBaseConfig-01-VNET and Subnet is subnet-01. This will ensure that the new Virtual machine is on the same network as the primary domain controller, DC-1. Check Delete public IP and NIC when VM is deleted. Uncheck Accelerated networking. Keep the default values for the remaining fields. Select Review + create.

Select Create to create the Virtual machine.
In this task, you will promote the newly created VM to a domain controller and configure it to be the backup to DC1.
Navigate to the hybrididentity-RG Resource group and select the BDC-1 Virtual machine.
Select Connect and choose RDP.

Connect to the Virtual machine with the username and password used in the previous task. If you get a prompt to click allow network discovery, select No.
From the Server Manager dashboard, select Add roles and features.

Select Next in the Add Roles and Features Wizard, at the Server selection tab, verify that BDC-1 is selected, then select Next for the Server Roles tab.
Select the Active Directory Domain Services checkbox under Roles.

When the Add features tile opens, uncheck the box for Include management tools (if applicable) and select Add Features to continue.

Select Next through Features and AD DS. At the Confirmation tile, select Install.

Select Close when the installation completes.
Right-click the network connection icon on the taskbar to open the Network and sharing center, (1) in the image below.
Select Ethernet next to Connections (2) in the image below.
When the Ethernet Status tile opens, select Properties (3) in the image below.
On the Ethernet Properties tile, select Internet Protocol Version 4 (TCP/IPv4) (4) in the image below, and select Properties (5) in the image below.
On the Internet Protocol Version 4 (TCP/IPv4) tile, select the radio button for Use the following DNS server addresses (6) the IP address of DC-1 (7). Select OK to save the changes. Then select Close; you may get disconnected from the remote desktop session at this point.

Restart the BDC-1 Virtual machine. If you were kicked from the RDP sessions, you can use the Azure Portal to reboot the virtual machine.
When BDC-1 restarts, RDP back into it. There will be a flag with a notification on the top right of the Server Manager Dashboard. Select this flag for the Post-deployment Configuration, and select Promote this server to a domain controller.

Select Add a domain controller to an existing domain, select Select.

Enter corp.contoso.com* for the server username and password demo@pass123** to authenticate to the domain.

Select corp.contoso.com and OK.

Notice that the domain is now set to corp.contoso.com, and the user to perform the operation has been specified. Select Next.

On Domain Controller options, keep Domain Name System (DNS) server and Global Catalog (GC) checked. Enter the password demo@pass123 for the Directory Services Restore Mode (DSRM) password. Select Next.

For DNS options, select Next.
On Additional options, select DC1.corp.contoso.com on the Replicate from drop-down and select Next.

Leave Paths the default value and select Next.

Review options and select Next.

Verify that All prerequisite checks passed successfully and select Install.

After installation, the VM will restart, and the BDC-1 will be configured as your Backup domain controller.
For clients to failover to BDC-1 when DC-1 is offline, the IP address of BDC-1 will need to be added as the Alternate DNS server within Internet Protocol Version 4 (TCP/IPv4) Properties on all domain-joined devices. On each device, repeat steps 10-15 in this task, but enter the internal IP address of BDC-1 as the Alternate DNS server address.

In this task, you will install and configure Azure AD Connect in standby mode. This will allow BDC-1 to take over identity synchronization if DC1 goes offline.
Since Azure AD Connect has already been downloaded and installed from the portal, on BDC-1, you need to navigate to the Microsoft Download Center to download Azure AD Connect for BDC-1.
Note: You may want to turn off Internet Explorer Enhanced Security Configuration and install Edge first. The URL to download and install Edge for Business is https://www.microsoft.com/en-us/edge/business/download.
https://www.microsoft.com/en-us/download/confirmation.aspx?id=47594The download should start automatically. If not, use the link to download manually.
After the download is complete, go to the Downloads folder in File Explorer and run the AzureADConnect installation or choose to Open file right from Edge.

After installation, the Microsoft Azure Active Directory Connect configuration wizard will start automatically. Accept the license terms to continue.

To configure the BDC-1 backup domain controller as a staging server, select Customize.

Select Install.

Follow the same steps as Exercise 1, Task 6, Steps 15-24. On the final Configure step, uncheck the Start the synchronization process when configuration completes checkbox, and select the Enable staging mode checkbox. Select Install to complete the installation of the configuration.

Navigate to the Windows Start menu and open Synchronization Service Manager.

Select Connectors, and select the first Connector with the type Active Directory Domain Services. Select Run, select Full import, and OK. Do these steps for all Connectors of this type.

Select the Connector with type Azure Active Directory (Microsoft). Select Run, select Full import, and OK.
Make sure the tab Connectors is still selected. Then, for each Connector with type Active Directory Domain Services, select Run, select Delta Synchronization, and OK.
Select the Connector with type Azure Active Directory (Microsoft). Select Run, select Delta Synchronization, and OK.
In this task, you will configure Azure AD Application Proxy for the BDC-1 VM.
Within the Remote Desktop session to DC1, in the Server Manager console, select Tools and then select Active Directory Users and Computers.
In the Active Directory Users and Computers console, select View and, in the View menu, enable Advanced Features.
In the Active Directory Users and Computers console, locate the new BDC-1 computer account under Domain Controllers within corp.contoso.com and display its Properties window.

In the BDC-1 Properties window, switch to the Delegation tab and select the option Trust this computer for delegation to specified services only.
Select the option Use any authentication protocol, select Add, in the Add Services window, select Users or Computers, in the Select Users or Computers dialog box, in the Enter the object names to select text box, type APP1 and select OK.
Back in the Add Services window, select the http entry and select OK.

In the DC1 Properties window, select OK.
Summary
In this exercise, you installed and configured a backup domain controller, set it up for Azure AD Connect standby synchronization, and added redundancy with the Azure AD Connect pass-through agents and Application proxy. You have now configured a resilient and available hybrid identity architecture.
Navigate to Azure Active Directory within the Azure portal. In the Azure Active Directory menu, select Security.

In the Security | Getting Started tile, select Authentication methods under the Manage section of the left tile menu.

Under Method, select Microsoft Authenticator.
The details will populate below, select Yes for Enable (1), select Select users for Target (2).
Select Add users and groups (3) in the image below and select Ann G. Ayers under users (4). Then, select Select to add the user (5).
Select Save (6) to save the configuration.

The next time Ann G. Ayers attempts to log in, they will be prompted to configure the Microsoft Authenticator app to complete authentication.
Lab summary
In this hands-on lab, you set up and configured a number of different hybrid identity scenarios. The scenarios involved an Active Directory single-domain forest named corp.contoso.com in this lab environment consisted (for simplicity reasons) of a single domain controller named DC1 and a single domain member server named APP1. You explored Azure AD-related capabilities that allowed you to integrate Active Directory with Azure Active Directory, optimized hybrid authentication and authorization, and provided secure access to on-premises resources from the Internet for both organizational users and users who are members of partner organizations.
Duration: 20 Minutes
You should follow all steps provided after attending the Hands-on lab.